

How to take a screenshot on mac and crop? Greetings, Mac enthusiasts! If you’ve ever found yourself marveling at a picture-perfect moment on your Mac screen and wondered, “How do I capture this masterpiece?” or perhaps thought, “This screenshot would be perfect if I could just trim it down a bit,” you’re in the right place. In this guide, we’ll embark on a journey into the art and science of capturing and refining screenshots on your Mac. Let’s dive in!
Table of Contents
1. The Basics: How to Take a Screenshot on Mac and Crop
Before we delve into the cropping magic, let’s start with the fundamentals. Taking a screenshot on your Mac is a breeze. Press a combination of keys, and voila! You’ve captured a snapshot of your screen. To perform this magic trick, hold down Command (⌘) + Shift + 3. Your screen will flash, indicating a successful capture. This method captures the entire screen, but what if you want more control? Read on!
2. Precision Capture: Snapping a Selected Area
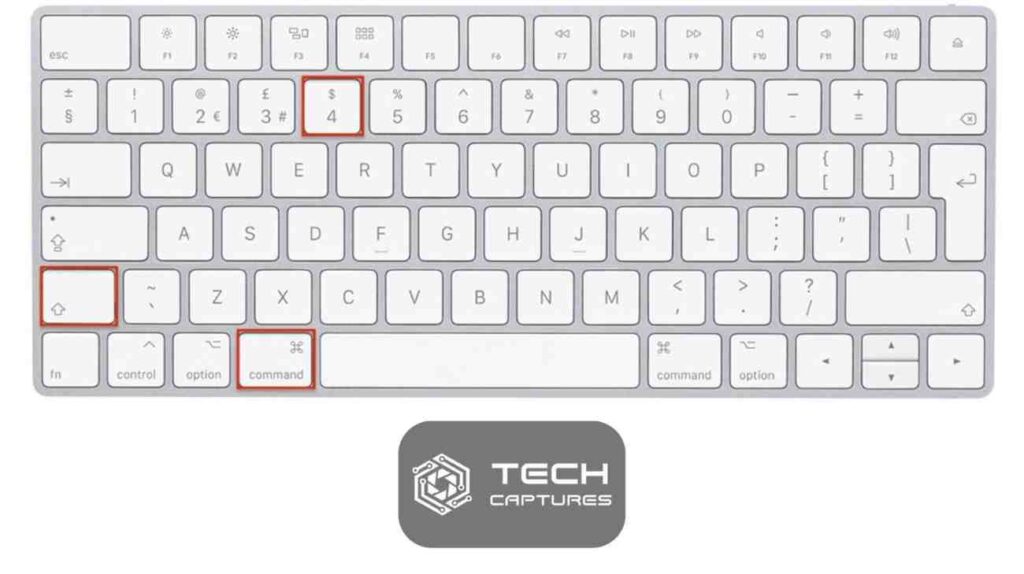
For those moments when you want to capture a specific area of your screen, the key combination is your wand. Press Command (⌘) + Shift + 4 and watch your cursor transform into a crosshair. Click and drag to select the area you wish to capture. Release the mouse button, and there you have it – a screenshot of the precise region you desired.
3. The Art of Cropping: How to Crop Your Screenshot
Now that you’ve mastered the art of capturing screenshots let’s move on to the next level – cropping. Imagine having the power to refine your screenshot, trimming away the excess, and focusing on what truly matters. To achieve this mastery, follow these steps:
- Open your Screenshot: Locate the screenshot you wish to refine. It’s like unwrapping a gift – anticipation builds!
- Enter Edit Mode: Double-click on the screenshot icon. This opens the image in the Preview app, your canvas for creativity.
- Select the Crop Tool: In Preview, click the toolbar’s “Show Markup Toolbar” icon – it looks like a pencil. Choose the Crop icon, represented by two overlapping right-angle brackets.
- Crop to Perfection: Click and drag to select the area you want to keep. The rest fades away, leaving only your chosen masterpiece.
By wielding these cropping skills, you transform a good screenshot into a great one, emphasizing the essence of your visual narrative.
That’s just the beginning of our journey into the realm of Mac screenshots.
4. Beyond the Basics of How to Take a Screenshot on Mac and Crop: Capturing Specific Windows
Sometimes, the magic you want to capture resides within a single application window. Fear not, for your Mac is equipped with the perfect spell – the ability to screenshot a specific window. Hold down Command (⌘) + Shift + 4, press the spacebar, and watch as your cursor transforms into a camera. Hover over the desired window and click. Presto! You’ve isolated and captured the window, ready to be showcased.
5. Commanding the Terminal: Screenshot Ninja Moves
For the adventurous souls delving into the command-line realm, there’s a powerful magic at your disposal. Open the Terminal and type:
bashCopy code
screen capture -c -r <x,y,width,height>
Replace <x,y, width, height> with the coordinates and dimensions of the area you want to capture. Execute and witness the screenshot magic unfold in the blink of an eye.
6. A Picture Speaks a Thousand Words: Annotating Your Screenshots
Your screenshots are not just static images; they’re stories waiting to be told. The Preview app allows you to add annotations, shapes, and text, turning your screenshots into dynamic visual narratives. Click the Markup Toolbar icon, explore the tools, and breathe life into your captures.
7. Troubleshooting Woes of How to Take a Screenshot on Mac and Crop: When Screenshots Go Awry
Even the most skilled magicians face challenges. If your screenshots are not appearing where expected or the magic seems to fizzle, fear not. Check your Mac’s storage, as a full disk may hinder screenshot saves. Additionally, ensure you’re not running low on RAM, as this can impact the screenshot process. A quick restart often works wonders in resolving these minor glitches.
8. Crafting Efficiency: Mastering Keyboard Shortcuts
Time is of the essence, and mastering keyboard shortcuts is the secret to efficiency. Press Command (⌘) + Shift + 5 to summon the Screenshot utility. From here, you can capture the entire screen, a selected window, or a chosen portion with a click. Efficiency meets elegance.
9. Expanding Horizons: External Apps for Screenshot Mastery
While your Mac’s native tools are powerful, third-party applications can take your screenshot game to new heights. Apps like Snagit, Lightshot, or Skitch offer advanced features, including instant sharing, cloud storage integration, and enhanced editing capabilities. Explore these magical tools to find the one that aligns with your sorcery style.
10. Mobile Magic: Screenshot Tricks on iOS Devices
Extend your magical abilities to your iOS devices seamlessly. On an iPhone or iPad, press the Side Button and the Volume Up button simultaneously. The screenshot appears in the lower-left corner, waiting for your Command. For cropping, access the Photos app, open the screenshot, and tap “Edit” to wield the cropping wand.
11. File Format Sorcery: Choosing the Right Screenshot Format
Not all image formats are created equal, and as a seasoned screenshot sorcerer, it’s crucial to select the right format for your enchanting captures. While PNG is the default format for Mac screenshots, you might opt for JPG for smaller file sizes or PDF for multi-page enchantments. To change the format, summon the Screenshot utility with Command (⌘) + Shift + 5 and explore the Format dropdown menu.
12. Organization Magic: Taming the Screenshot Chaos
As your collection of magical screenshots grows, maintaining order becomes paramount. Create folders dedicated to specific projects or themes, ensuring each enchanting capture finds its rightful place. A well-organized library not only enhances your workflow but also allows for quick retrieval of past spells.
13. Privacy Shields: Ensuring Sensitive Information Stays Hidden
In the mystical realm of screenshots, protecting sensitive information is a priority. Before sharing your enchantments with the world, review each capture for any confidential details. The Markup Toolbar in Preview can be your shield, allowing you to obscure, redact, or strategically place magical annotations to safeguard secrets.
14. The Cloud Conundrum: Uploading Screenshots to the Cloud
For those seeking an ethereal sanctuary for their screenshots, the cloud beckons. Leverage cloud services like iCloud, Google Drive, or Dropbox to sync your magical captures across devices seamlessly. This ensures that, no matter where your journey takes you, your enchanted library remains at your fingertips.
15. The Final Flourish: Sharing Your Enchantments
What good is a powerful spell if it remains hidden? Sharing your screenshots is the ultimate act of magic. Whether it’s for collaboration, feedback, or showcasing your magic on social media, the Preview app and third-party tools offer myriad ways to share your enchantments with the world. Click the Share icon, and let the magic spread far and wide.
Conclusion
How to Take a Screenshot on Mac and Crop? Capturing and refining screenshots on your Mac is a journey of both art and science. From the basics of taking a screenshot to the advanced sorcery of cropping, annotating, and sharing, your Mac is versatile and ready to bring your digital magic to life. As you venture further into the world of screenshots, remember: the more you practice, the more powerful your enchantments become.