How to Make a Shield in Minecraft and Why Do You Need It? In the vast and adventurous world of Minecraft, a shield is an essential tool for any player who wants to survive the perils of the game. Whether you’re battling hostile mobs, exploring treacherous terrains, or engaging in thrilling combat, a shield can be your trusty companion, offering invaluable protection and defense. But before we delve into how to make a shield in Minecraft, let’s understand why it’s so crucial.
Minecraft is a game that encourages exploration and survival, and with that comes the inevitable encounters with hostile mobs, ranging from creepers to skeletons, zombies, and more. These mobs can inflict significant damage, and without proper protection, you might find yourself in a precarious situation. That’s where the shield comes into play – it acts as a barrier, deflecting incoming attacks and reducing the damage you take.
Additionally, a shield can be a game-changer in player-versus-player (PvP) scenarios, providing a tactical advantage against opponents armed with swords, bows, or other ranged weapons. By blocking their attacks, you can gain the upper hand and counterattack more effectively.
Table of Contents
How to Make a Shield in Minecraft By Gathering the Required Materials

To embark on your shield-crafting journey, you’ll need to gather a few essential materials. The first and most crucial component is wood planks. Wood is abundantly available in Minecraft, and you can obtain it by punching or mining trees with your bare hands or any tool.
Once you’ve acquired some wood logs, you’ll need to convert them into wood planks using a crafting table. Six wood planks are required to craft a shield, so make sure you have enough. The type of wood you use is entirely up to your preference – oak, birch, spruce, or any other variant will work just fine.
The second material you’ll need is an iron ingot. Iron ore can be found in various locations throughout the Minecraft world, but it’s particularly prevalent in caves and underground ravines. Mine the iron ore using a stone pickaxe or better, and then smelt it in a furnace to obtain an iron ingot.
With six wood planks and one iron ingot in your inventory, you’re ready to proceed to the next step – the crafting process.
How to Make a Shield in Minecraft: Step-by-Step Guide
Now that you have all the necessary materials, it’s time to learn how to craft a shield in Minecraft. Follow these simple steps:
- Open your crafting table or crafting grid (the 3×3 grid in your inventory).
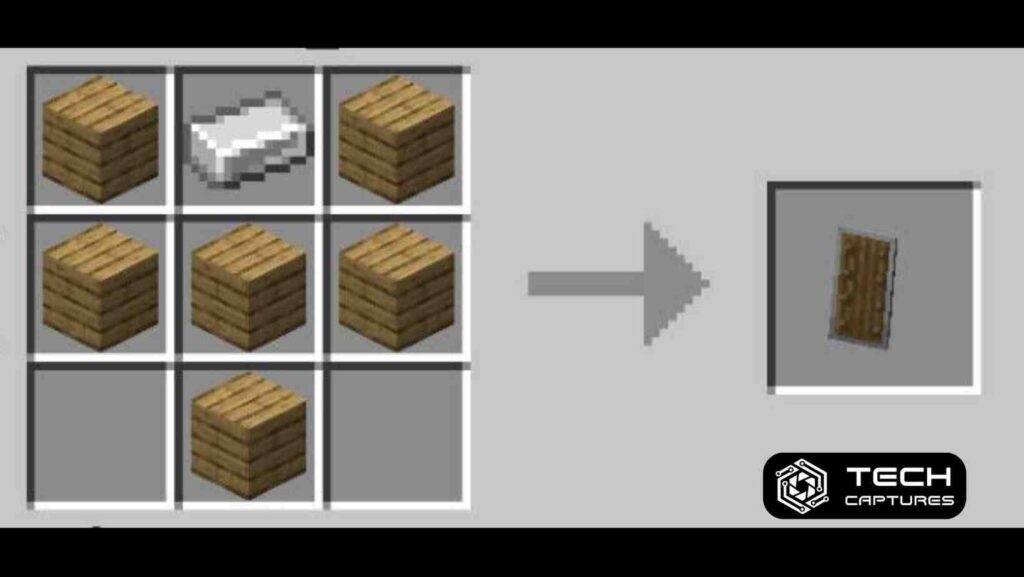
- Arrange the six wood planks and the iron ingot in the following pattern:
Plank | Iron Ingot | Plank
Plank | Plank | Plank
| Plank |
This pattern forms a “Y” shape, with the iron ingot at the top center position.
- Once you’ve arranged the items correctly, the shield should appear in the output slot of the crafting grid.
- Take the shield from the output slot and place it in your inventory.
Congratulations! You’ve successfully crafted your very own shield in Minecraft. However, the shield’s journey doesn’t end here – there are several ways to customize and enhance its functionality.
Customizing Your Shield with Banners and Patterns
While the basic shield offers excellent protection, you should add a personal touch or flair to your new defensive tool. Minecraft allows you to customize your shield by applying banners and patterns to its surface.
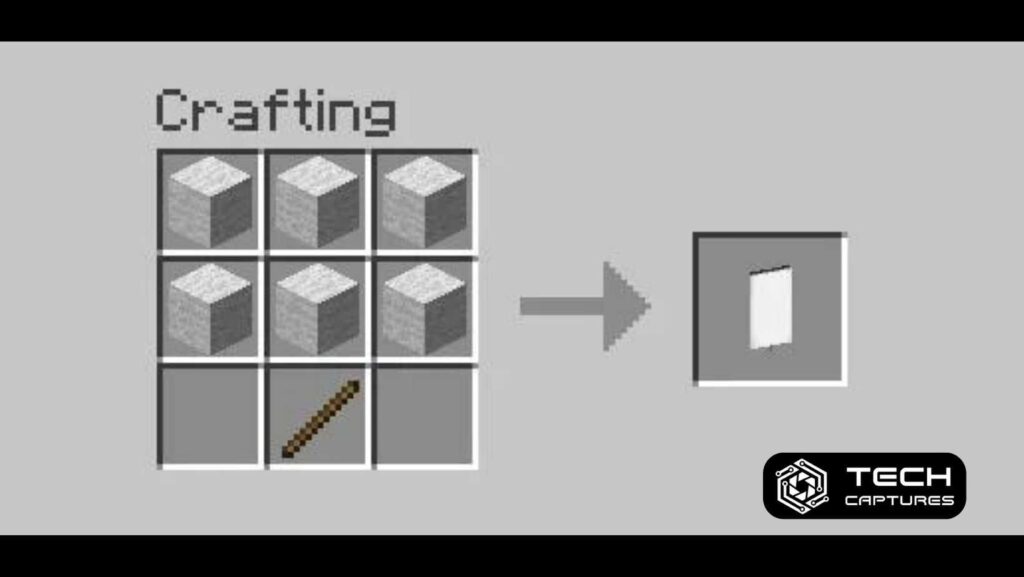
To do this, you’ll need to craft a banner first. Banners are created by combining six wool blocks (of any color) and a stick on a crafting table. Once you have a banner, you can further customize it by adding patterns using various dyes and materials.
After creating your desired banner design, combine it with your shield on a crafting table. The banner’s pattern will be applied to the front face of the shield, giving it a unique and personalized look.
Repairing and Enchanting Your Shield for Improved Durability
Like most tools and weapons in Minecraft, shields have a durability value that decreases with use. Eventually, your shield will break and become unusable. However, there are ways to extend its lifespan and enhance its capabilities.
Repairing a Shield:
- Method 1: Combine your damaged shield with wood planks in an anvil. This will restore some durability to the shield, but it will also remove any customized patterns or enchantments.
- Method 2: Combine two damaged shields in a crafting table. This will create a single, repaired shield with the combined durability of the two original shields. However, like the anvil method, any patterns or enchantments will be lost.
Enchanting a Shield:
Enchanting a shield can significantly improve its performance and longevity. Here are some useful enchantments for shields:
- Unbreaking: Increases the shield’s durability, making it last longer before needing repairs.
- Mending: Allows the shield to repair itself automatically by absorbing experience orbs (XP) collected from defeating mobs or mining resources.
- Curse of Binding: Causes the shield to become permanently bound to the player, preventing it from being removed or dropped.
To enchant a shield, you’ll need an enchanting table and the experience levels (XP) required for the desired enchantment.
Advanced Techniques Shielding and Combat Strategies
While the primary function of a shield is to provide defense, it can also be employed in various combat strategies and techniques. Here are some advanced tips and tactics for using your shield effectively:
- Blocking and Counterattacking: With your shield equipped, you can right-click to block incoming attacks from the front. This not only reduces the damage you take but also creates an opportunity for a counterattack. After successfully blocking an attack, quickly switch to your weapon and strike back at your opponent.
- Shieldless Blocking: Even if you don’t have a shield equipped, you can still block attacks by holding the right-click button while standing still. However, this method is less effective than using a shield, as it offers minimal damage reduction.
- Knockback Resistance: When blocking with a shield, you’ll experience less knockback from enemy attacks, allowing you to maintain your position and continue attacking or retreating as needed.
- Protecting Allies: In multiplayer scenarios or when adventuring with friends, strategically position yourself with your shield to protect your allies from incoming attacks, allowing them to focus on offensive strategies.
- Environmental Protection: Shields can also protect you from environmental hazards like falling anvils, explosions, or even lava and fire damage (to a certain extent).
Remember, effective shielding and combat strategies take practice and experience. Don’t be discouraged if you struggle initially – keep honing your skills, and you’ll become a formidable warrior in no time.
Frequently Asked Questions (FAQs)
Can a shield block all types of damage?
No, shields in Minecraft are primarily designed to block melee and ranged attacks from mobs and players. They offer limited protection against environmental hazards like lava, fire, or fall damage.
Do shields have durability?
Yes, their durability value decreases with each successful block. When it hits zero, the shield will shatter and be rendered unusable.
Can I enchant a shield with multiple enchantments?
Yes, you can apply various enchantments to a shield, such as Unbreaking, Mending, and Curse of Binding, to enhance its capabilities and longevity.
Can I use a shield in my main hand?
No, shields can only be equipped in the off-hand slot (the slot to the right of your character model). Your main hand should be reserved for weapons or tools.
Do different types of wood affect the shield’s durability or properties?
No, the kind of wood used to craft the shield does not affect its durability or any other properties. It only determines the shield’s appearance.
Conclusion
How to make a shield in Minecraft is a crucial skill for any player looking to survive and thrive in the game’s challenging environments. By following the step-by-step guide outlined in this article, you’ll be well-equipped to create your very own shield, customize it with banners and patterns, and enhance its durability through repairs and enchantments.
Remember, a shield is not just a defensive tool—it can also be a valuable asset in combat strategies. It allows you to block attacks, counterattack effectively, and protect yourself and your allies. With practice and experience, you’ll become a master of shielding and combat, ready to take on any challenge that Minecraft throws your way.
So, grab your materials, fire up your crafting table, and start forging your path to becoming an unstoppable force in the world of Minecraft.

