Browsing history is a digital footprint of our online adventures, and managing it is crucial for privacy and device performance. In this guide, we’ll explore the step-by-step process of how to delete history on Chromebook, ensuring a seamless and private browsing experience.
Table of Contents
Understanding Chromebook Browsing History
Before diving into the deletion process, it’s essential to understand what browsing history entails. It comprises a record of websites visited, searches made, and pages viewed. Managing this history is vital for safeguarding your privacy.
Reasons for How to Delete History on Chromebook
Privacy Concerns
Every click leaves a trace, and clearing history is your digital broom, sweeping away traces of your online activities. This is especially important if you share your device with others.
Enhancing Device Performance
A cluttered history can slow down your Chromebook. Regular deletion helps keep your device running smoothly by optimizing storage.
Customizing Browsing Experience
Clearing history allows you to start each browsing session with a clean slate. No more autocomplete suggestions or revisiting old pages unintentionally.
How to Delete History on Chromebook Via Step-By-Step

Below are the steps that will help you out in deleting the history on your Chromebook.
Step 1: Accessing Chrome Browser
Begin by locating the Chrome icon on your Chromebook. Click on it to open the browser.
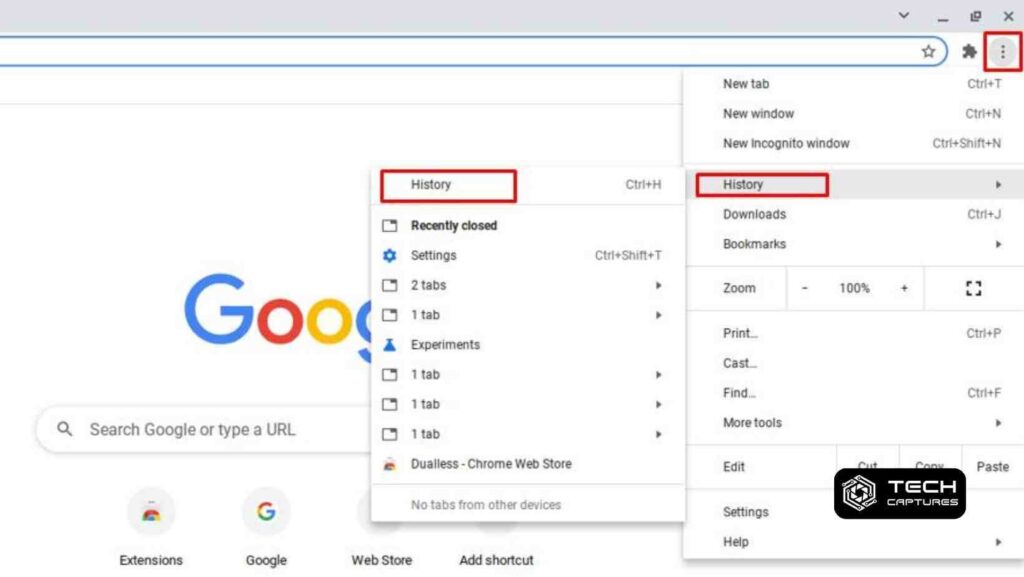
Step 2: Navigating to History
In the Chrome menu, find the “History” option. Clicking on it will take you to the browsing history page.
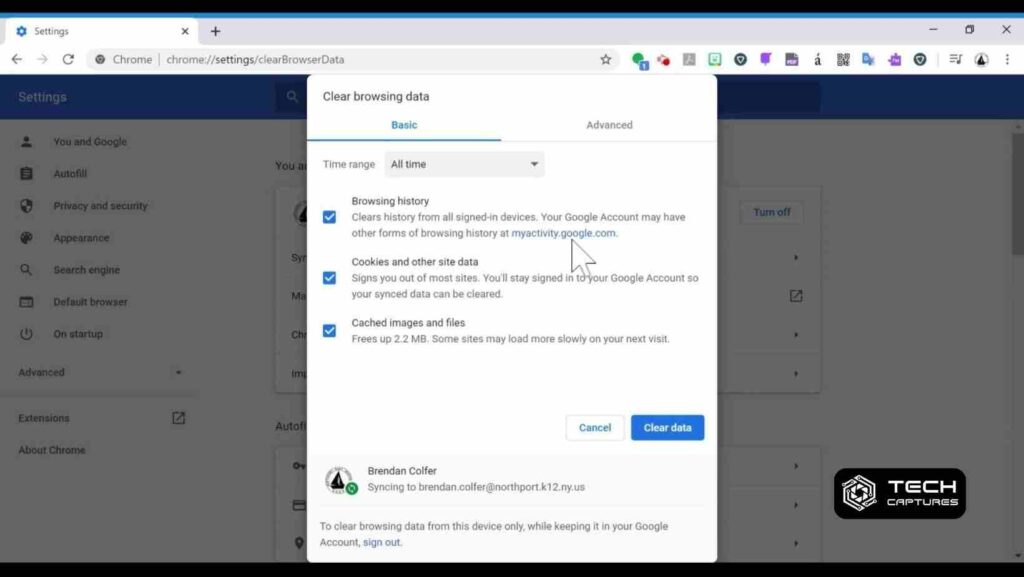
Step 3: Choosing the Time Range for Deletion
Select the time range you want to delete. This can range from the last hour to the beginning of time. Choose wisely to suit your privacy needs.
Step 4: Selecting Items for Deletion
Scroll through your history and tick the checkboxes next to the items you want to delete. For bulk deletion, use the checkboxes strategically.
Step 5: Clicking on “Remove Selected Items”
Confirm your selection by clicking on “Remove Selected Items.” Remember, this action is irreversible.
Alternative Method: Using Keyboard Shortcuts
For the keyboard aficionados, use “Ctrl + Shift + Del” to access the deletion options quickly. Navigate with the arrow keys and confirm with “Enter.”
Ensuring Privacy After Deletion
For added privacy, consider logging out of your accounts after history deletion. This extra step ensures a thorough cleanup.
Educational Section: Chromebook Storage Optimization Tips
Optimize your Chromebook’s performance by managing other storage aspects. Clear cache and cookies regularly to keep your device in top shape.
Common Mistakes to Avoid
Be cautious not to delete important data accidentally. If it happens, check the recovery options or restore from your synced Google account.
Benefits of Regular History Deletion
Regular history deletion translates to a faster device and heightened privacy. It’s a simple task with significant rewards.
Conclusion
In conclusion, how to delete history on chromebook? Regularly clearing your browsing history is a small yet impactful step towards a smoother and more private online experience. Follow the outlined steps and enjoy a clutter-free digital journey.
FAQs
Q1: Can I recover deleted browsing history on a Chromebook?
Yes, you can. Google syncs your data, allowing you to recover deleted history. Check your synced account settings for retrieval options.
Q2: Does clearing history impact saved passwords?
No, clearing history doesn’t affect saved passwords. However, it’s advisable to keep them secure by using a strong password manager.
Q3: Are there any risks in not clearing history regularly?
Yes, accumulated history can compromise privacy and slow down your device over time. Regular deletion mitigates these risks.
Q4: How often should I clear my browsing history?
The frequency depends on your browsing habits. If privacy is a top concern, consider clearing it weekly or after sensitive sessions.
Q5: Is it necessary to log out of accounts after history deletion?
While not mandatory, logging out adds an extra layer of privacy. It prevents accidental access to sensitive information by others.

